Showing posts with label reuse/recycle. Show all posts

Tuesday, April 14, 2015

Microwave & printer carts turned coffee station

I recently inherited a microwave cart. If you're too young to remember, microwaves used to be enormous and a special cart for one was really the most practical way to contain the beast and still have counter space left. The one I inherited was made by my grandpa out of juniper wood and even has wheels!

My microwave is pretty small and looked pretty silly sitting on it so I decided to free up space in my pantry by moving all my coffee and tea goodies onto the cart instead.

I also had a random printer table (back when printers used to be huge - do you see the trend? My current printer is tiny) that I've just never gotten rid of. It is doing me a favor by hiding some of my appliances in the lower shelves but the top was free space.

 photo IMG_8345_zps7xknsygq.jpg

Side by side in my kitchen entry they help visibly break up the space instead of making my kitchen and living room look like one big area. Some linen burlap as runners and a hide-the-mess curtain unify them since clearly these two things don't match at all (except that they are victims of the modernization of appliances).

The top is a mix of thrift and bargain store finds holding cocoa mix, coffee beans, an assortment of favorite teas and all the various additions you could wish for (honey sticks? coconut sugar? cane sugar? cinnamon?)


 photo IMG_8352_zpsegexnpqf.jpg


These great vintage inspired jars have a nice tight seal for keeping food items fresh (I found mine at Hi-School Pharmacy). My coffee beans are kept air tight as well (I like locally roasted, ethically sourced Garage Coffee)

 photo IMG_8353_zpsqnuyign4.jpg


Below I have a pair of locker baskets that have been around so long I don't even know where they came from. They used to be under my bed doing a really inefficient job of holding old receipts and a really efficient job of gathering cobwebs.

 photo IMG_8356_zpskqsn8itq.jpg

I keep some of my favorite items readily accessible in one and my French press and fancy kettle for pour over coffee in the other (because you need a special kettle. Because of course you do).

On the lowest shelf I put a pair of collapsible baskets? Bins? I found at Ross for $3.99 for the pair. All my boxes of teas are in one and then random tea ware is in the other (all the strainers, steepers, pots, you name it)


 photo IMG_8357_zpsxpi5w0uu.jpg

My other flat surface is where I decided to put my new obsession: pour over coffee apparatus. I attended a coffee class hosted by the Garage Coffee guys and now I'm just completely obsessed. I hardly ever drink coffee but when I do I want a good cup of joe.


 photo IMG_8347_zpsl8obvpyr.jpg

My burr grinder and Hario V60 coffee stuff I ordered from amazon. I found the gorgeous cutting board I'm using as a platform for them at Ross. A dollar store napkin holder is keeping my filters in place. And a thrift store jar is holding some cranberry pistachio biscotti I found at Grocery Outlet.


 photo IMG_8349_zpsvvwacfey.jpg

And of course chocolate syrup because I like my coffee when it's mostly chocolate.

A tension rod, little curtain clips and a piece of linen burlap (which I found in the yarn/rug making section of Joann) is keeping everything looking tidy and slightly rustic.


 photo IMG_8358_zpslbwaqwwi.jpg


And this wall was way too boring even with all this for me to leave it alone so I hung some artwork I got from my friend Megan (and which came from Hairbrained Schemes on Etsy)

 photo IMG_8351_zpsmvhekw6i.jpg


And a thrift store frame filled with downloadable and printable art (from Joyful Art Designs on Etsy)

 photo IMG_8350_zpsqk8qovbx.jpg


I'm in love. It's like living in a coffee shop (sortof) and really isn't that what we all want? Now to make my bathroom look like a luxury hotel...

I, of course, found a ton of inspiration on pinterest. Here are some of my favorites:

Coffee & Tea station
Chalkboard coffee station
Coffee station on a cupboard

You can also follow my coffee obsession on my pinterest board Magic Beans.


Monday, March 5, 2012

More thrifted and recycled bathroom goodies


I needed a soap dish for my facial soap. I've been using a little blue and white saucer but it didn't really go with my aged steampunk direction. I walked to Goodwill again and dug and dug through the dishes. The one near my work is not a large shop and I began to give up that I'd find anything I could use when I spotted a short stack of these little off-white, shallow bowls.

The price sticker was covering the stamp on the bottom but it was only .99 until I realized it was the half price color of the day and I got it for .49 cents. I went home to clean it up, removed the sticker and discovered I had some ironstone!


It does the job perfectly and looks nice (and simple) as well.

Then I needed a solution for my moisturizer. I love Cetaphil but that gigantic blue and white bottle? Not so much. I recently finished using a bottle of organic yummy scented hand soap and it had the perfect "old brown bottle" look. I thoroughly washed the bottle, peeled the label, used some Goo Gone on the residue and transferred my moisturizer.


Granted, when I get a new bottle, this one won't hold all of it, but the look is much more cohesive.

.49 cents and 2.75 new but recycled - my budget barely budged.

See what else I made for my simple steampunk bathroom project. Although I'm starting to wonder if this isn't so much steampunk as just....aged. Oh well, I like both!

Sunday, January 15, 2012

A bit of a pane


My mom was given this old farmhouse window and it was in pretty rough shape but perfect if you like the junque patina.

However, there was a bit more dirt on here than was really desired. I did do a bit of cleaning and I definitely cleaned the glass but I didn't want to do too much to this because I was pretty sure this was lead paint.


After giving it a mild cleaning I added two coats of oil-based varnish to keep the paint from continuing to flake off absolutely everywhere. It was an enormous pain of a pane to varnish because of all those strips between the pieces of glass. I felt like I was never going to be done.

It goes great above her fireplace....tv stand....mantel....whatever. She actually rested it on a couple of small pieces of that grippy stuff you buy in a roll and put in shelves. It doesn't slide and it solves the problem of, how do you hang something this big and heavy without ruining the window or ruining the wall?


I think it has great character and goes perfectly with her style.
Oh my gosh I just remembered she has a fireplace DVD - I totally should have put that on while I shot these photos! :)

Wednesday, November 30, 2011

Kid in a candy store - scrap storage

I've had this dream of a craft room inspired by an old fashioned candy shoppe because surrounded by craft supplies I really am like I kid in a candy store.

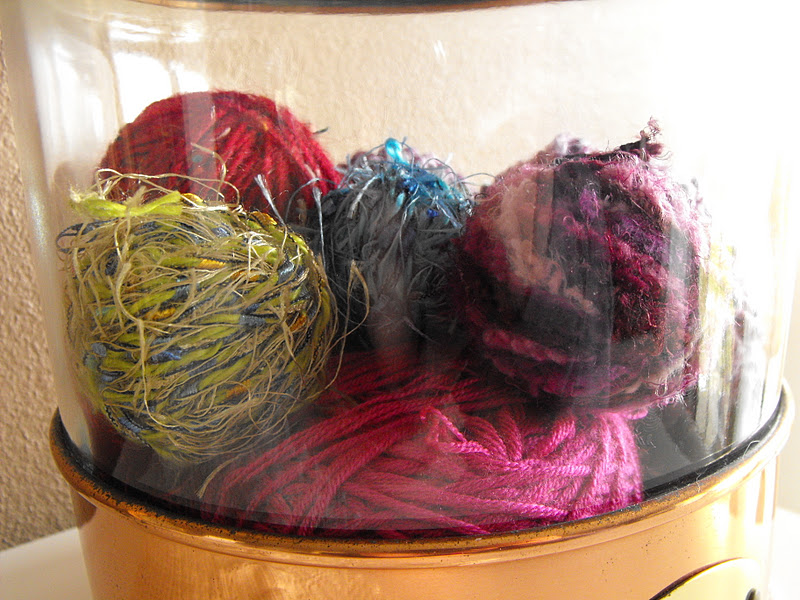
To help that along I put some of my colorful bits and pieces in jars with lids that I spray painted black. Recently I added a thrift store find to hold my scraps of yarn that I've wound into balls.


It's colorful like candy so it works, doesn't it? :)


Below: my recycled food jars with painted lids store my buttons and ribbon scraps.


It's just a start, but it has to start somewhere!

What do you dream your craft space to look like?


Wednesday, October 26, 2011

Thrifted photo cloche

I found this new (read unattractive) floral frog at Jo-Ann. It cost me a dollar. It was marked defective or deformed or something because a few of the spikes were bent. How many pair of pliers do I own? This is not going to be a problem.

It took me less than a second to fix the spikes but I decided to go ahead and spray paint this thing as well since the green was hideous and I'm not actually going to be submerging it in water. I painted it with a couple coats of antique brass metallic.
When I was cleaning after being gone for what amounts to almost my entire summer, I found this salsa jar holding some odds and ends. So classy. Instead of throwing it away I decided to use it for this project by giving it a couple coats of black spray paint.


And it became the base for my photo cloche. The key to this was layers. I used a little doily which I'm not usually a fan of, but it helps the jar lid look like less of a jar lid with some paint on it. With the newly painted floral frog, a tattered photo of my mom (I'm guessing my dad carried this around for quite a while) and the ten cent glass top I found at a garage sale this summer, my little display will now keep this photo out for display and dust free.


shabby creek cottage


Thursday, April 21, 2011

My "where did I put that?" basket

 I don't know about you but I have a handful of objects that I use frequently and can never seem to leave in the same spot making me hunt for them each time I want them. Well no more. This basket - from a bath gift set if I remember correctly - is my catch all for these items. Batteries, cords, camera cases and remotes now have a snug home in semi-organized style.


An empty, clean salsa jar now holds a camera case strap, a battery tester and a connector for my camera cord. These small things would normally get lost in the bottom of this basket, but this holds them together.


This isn't particularly stylish but I tied my most used cords together with bread twist ties. I'm not sure how I managed to have six in matched pairs but I did. Now I only have to look at the color and I know which cord I am grabbing. And since these get almost daily use, that is a time saver I appreciate!


No more looking, wondering and frustration over those items anymore.


And speaking of forgetfulness let me tell you there are some quirks to driving a "vintage" vehicle. Like how opening the door doesn't set off a buzzer to tell you you've left your lights on.

This sign I made from a cereal box and some ribbon. I merely painted the plain side of the box and wrote my message with a Sharpie. I won't forget now! Wait...what was I talking about?


Wednesday, March 9, 2011

Bookmark storage

Hurray! I accomplished something crafty - other than jewelry making - this week!

This sort of project always comes about because the need is there. I saved this tin after I drank the last of the tea this winter. I only drank it during winter because this tea was so amazing (and called winter fruit blend) and I wanted it to last. I admit, I cried a little when it was gone and stubbornly used the last bits of it even though it was way too small for my tea strainer and filled my cup with tea leaves. *sigh*

Still...the tin smells amazing! And the paper label peeled right off, thank goodness!


I raided my paper stash and discovered this cute blue and brown polka-dot. I measured around my tin, cut my paper to width and glued it on with a light amount of regular white glue applied with a small, old, ratty paint brush. White "school glue" generally washes right out but why risk ruining a nice brush, right?

The bottom lip is black and could be left alone and to get it to fit at the rounded top, I actually cut my paper short so the top is left uncovered. It makes the paper fit better and you really don't even notice it since the tin is silver and goes well with the pale blue.

As you can tell I so needed something to store my bookmark collection. Even my wider ones fit and I can dangle the string kind out to see one side. Perfect and it takes up much less room than the box I was considering.

Now back to my cleaning and organizing...

Linking to:


Transformation Thursday

Tuesday, December 21, 2010

Christmas decorating outside

If you visited my blog in early June you may have seen [this post] about trying to make my outdoor entry more clear and inviting.

Now that winter is here my herbs in the planter box and plant stand are hibernating (ie gone or drooping sadly) and I've got the vent stuffed with old jeans to keep out the cold. Classy.

I never get rid of the branches that have to be inevitably cut from the Christmas tree. Instead I put them to good use as greenery around the house and even outside the house.


I am still in desperate need of a chalk pen but to be fair on my handwriting that old chair back is an incredibly rough surface to write on.


I stuffed clipped branches and some ivy I trimmed off into the pot that normally holds chives and oregano. This way I can just pull them out and toss them when my herbs perk up and start growing this spring.


These branches hide the jeans-stuffed vent just wonderfully! The stag creature is a tea lite holder and I'll add one the night of the Christmas party for extra warmth and pretty.


Christmas tree branches even fill up the flower box and hide my bare dirt while the oregano sleeps.

So don't get rid of those trimmed tree branches - you never know where you can use them!


Sunday, November 14, 2010

Queen of Junque - an upcycled crown

I've been crowned a Queen of Junque!

Okay...so I had to make my own crown...does it still count? :)

It all started when I saw this:

In my friend's garbage can. Yes, I garbage can dived. No one saw me so it was sneaky garbage can diving too. My friend and her husband had installed a clothes dryer and this was a leftover piece or an old piece, I can't remember. I saw it and knew it needed to be a crown. But that was months ago!

In September I bought a bucket at Goodwill and turned it into [this project]. It came with a little of what I called "Christmasification" that needed to be removed but I had just the thing to use them on (they were whispering "crown adornment" at me, I swear)


I needed height on my "crown" and since this was looking very much like a shabby chic junque project (and I knew I had a ton of it) chicken wire seemed my best bet! I made sure to cut a section wide enough to fit the circumference of the dryer fitting.


The lip in the center of the fitting was perfect for holding my chicken wire in place and I snipped the excess off the top leaving little uplifted bits to look like crown points. Where the wire meets in back I simply twisted it together to hold its round shape.


I recommend wearing some medium thickness gloves for working with the chicken wire. I also had some medium sized wire cutters (not the tiny ones I use for jewelry making).


Twisting the beaded sprigs onto the chicken wire was just a matter patience and a little finesse with some needle nose pliers.


For the bottom half - since I didn't want it to be rough or scratching any surface I happened to set it on - I used a long rectangle of white eco-felt and glued it both inside and outside of the crown edge.


I used some white decorative trim to cover the seam between the eco-felt and the dryer fitting.


And that, dear friends, is how I got crowned Queen of Junque. My friends and family now know that I will really make something out of anything. No one's garbage cans are safe! ;)


Also, don't give up if you have an idea and it doesn't come together right away. Like I mentioned earlier it took me months of little bits trickling into my stash and for me to formulate the right way to put them together.


But I think I need a smaller "head" for it to sit on...


Linking to:


House of Grace's Twice Owned party

The Shabby Chic Cottage's Transformation Thursday