Wednesday, April 29, 2009

May Day surprise

This project featured on: One Pretty Thing, The Crafty Crow and My DIY Wedding Day


My mom taught me about this when I was little and for years I took a May Day basket to my neighbor, sneakily hung it on the doorknob, rang the doorbell and disappeared. That's how May Day baskets are supposed to work - like ding dong ditch only with something nice!

Typically this is for children but it's also fun for adults...obviously since I'm still doing it. *grin*

This year I'm blending a few ideas to make this easy and free!
So grab your kids and make a May Day present for your neighbors that celebrates Spring and is something they are sure to enjoy.


Materials:

newspaper
toilet paper tube
scissors
pencil
paint
1" paint brush or sponge brush
small bowl
white school glue
large string or medium sized ribbon
hole punch
large, circular object to trace


I used the largest pan lid I had and traced it onto the local advertisements we get for free. Doesn't really matter what is on there since I plan to cover it up anyway!


Cut out the circle. Kinda looks like a papery pie!


Then fold it in half. Now it looks like you have half a pie. Cut a triangle slice out of the pie.


Now you've got your basic shape and you need color. Make sure you've got a few layers of paper or ads to cover your work surface.


I made a thick wash - by adding just a tiny bit of water to the paint - to cover the paper, but it still has a slightly see-through, rustic quality to it. Once applied, make sure to move your newly painted paper so it doesn't stick down to the work surface and rip. I painted both sides of the paper so the inside of my cone would have color too.


While I was waiting for that to dry, I also applied the thick wash to the inside and outside of the toilet paper tube as well. Drying time is pretty short for something like this, even when doing both sides.


Once you're sure it's all completely dry, apply some glue to the bottom of the toilet paper tube and form your paper cone around it, with the tube sticking up directly in the middle.


The tube is going to add some stability to the cone (since newspaper is pretty floppy!) and at the same time it will contain your flowers in a tighter bunch and keep them from falling down into the cone.


Be sure to glue along your outside seam so the cone doesn't have a gap. It may not want to press down perfectly, but that's okay too!


While this is drying you can hole punch on either side of the cone and thread your string in. I threaded in a thick jute string and knotted it on the inside but if your string or ribbon isn't thick enough you can loop it through and tie it on top.


Still waiting for things to dry? How about making some embellishments! Use your scrap newspaper and cut small circles. Like before, fold in half and then freehand some "petals." When you open it up you'll have a flower shape!


To these I made a new wash using a cheery yellow. You could also try butterfly shapes in keeping with the spring theme. To the embellishments you only need to color one side. Again, make sure to move them after painting so they aren't sticking to the work surface. Let dry completely.


Once everything is dry you can glue on the extras (I used a couple of mine to help keep the seam tacked down).

Now it's time for the flowers! Wander around your yard and gather a variety of colors. For filler greenery I added several sprigs of thyme so not only does it smell good but it adds dimension to the bouquet.


Have fun surprising the neighbors and teaching the kids joyful giving!


They also make really cute chair decorations!


Sunday, April 26, 2009

Work in progress

Some projects seem SO simple. *cue eye roll*

Thanks to Reinvented I decided I'd start saving jars as I emptied them. I am kindof a storage nut *blushes* and I love when things are free so this seemed perfect!

I saved three jars: salsa jar, diced tomato jar, and Favorit Swiss Preserves jar.

First of all, once they were empty I ran them through the dishwasher, lids included.

The salsa and diced tomato jar had ugly lids and I wasted no time in spray painting them Heirloom White. Here's where began the first problem. The can was...on the empty side so I wasn't able to coat them as completely as I'd have liked. You can still kinda see the writing along the edge of the lid although it is quite faded. I decided ribbon would do the trick and applied some black and white polka-dot ribbon. Actually the wording worked as a great guideline for keeping the ribbon straight!


My next problem was in the label. WHAT in the world are these people using for glue?! Razor knife and lots of rubbing alcohol later I finally got ONE of the label's residue off. I can't for the life of me find my Goo-Gone and I wonder if that wouldn't simplify things. *sigh*


Then I decide to make labels and that's when I discovered the printer was out of ink. *double sigh* So I can't make my cute labels until I get that fixed. You'd think that would be easy but when you live almost an hour away from any office supply stores it's not like you can just run in there and get ink. So that may take me a few days...more...


So here they are half finished. But hey it's that much closer to redecorating my bathroom!


And it isn't like I have been doing nothing. I rototilled three gardens (all mine, can you believe it?), listed a bunch of things on ebay and spruced up my etsy!
Keep your fingers crossed for me that I can get my ink soon and back to the crafting!

Friday, April 24, 2009

8 Things

Brittany at Food for Thought tagged me and since I've been such a slacker about posting my crafty projects lately I thought that was perfect timing!

My printer has been out ink and it is putting a serious cramp in my crafting style! I had no idea I relied so heavily upon it. I have three projects in the works though...does that count for something?


8 Things I'm Looking Forward To:

*Ink for the printer! haha
*Seeing Megan and fam this weekend
*The arrival of mini-Karen (she won't share the name until she's born)
*A new haircut (I stole this from Brittany but I haven't been to the salon in 8 months!)


Layers, not the dark brown.


*Not having to cook tomorrow - pizza night!
*Getting my truck fixed (Gee is 330,000+ miles tough on it?!)
*Tax refund! Woowoo!
*Redecorating the bathroom


8 Things I Did Yesterday:

*Took my mom's dog to the groomer
*Finished Ten Big Ones by Janet Evanovich (best ending scene in a book ever)
*Started Eleven on Top by JE (I'm a newly converted Stephanie Plum junkie!)
*Tried to break in some new flip flops...still trying
*Realized how annoying yahoo messenger is
*Learned how to attach the rototiller to the tractor
*Took photos of the sunset


Okay that's my uncle's place in Arizona and it was last year.

I haven't yet uploaded the pics I took last night at my house.

*Made a yummy dinner and watched it disappear - always gratifying


8 Things I Wish I Could Do:

*Fix cars


*Play a PS2 game without running my character into stuff
*Have no financial limits so I could be as generous as I want to be (you know the love languages? I'm a gift giver - want to be my friend? *wink*)
*Play piano...and maybe the cello
*Grow a few inches so I don't have to stand on my toes to put the dishes away (I'm 5'2")
* Speak Spanish fluently. After so much disuse I've forgotten a lot.
*Math. Blargh.
*Go out in public with no makeup and not feel weird about it

8 Shows I Enjoy:

*Psych

*Burn Notice
*The Mentalist
*Criminal Minds
*The Office
*Castle
*Bizarre Foods with Andrew Zimmern
*Decorating Cents


Friends I Am Tagging:

Megan
Karen
Savanah

Kristy

Monday, April 20, 2009

Candy fluff

I told you I loved this tree.


Especially on days like this.


And remember how I was exclaiming at how good my quince blossoms were smelling? Now that they are almost fully bloomed I can't smell a thing! Weird.


Thursday, April 16, 2009

Mom It Forward charity auction

SITS is hosting a charity auction Friday the 17th
to help support Mom it Forward.
All proceeds from the auction sales will go to the Mom it Forward organization.


I donated one of my necklace creations for the auction


so go spend some money and help support women in Kenya!

Sunday, April 12, 2009

Upcycled Yarn Holder

There are new shinies in the shop!


Be sure to check out the other projects for Trash to Treasure Tuesday over at Reinvented!

This project


To warn you this post is a little lengthy because there were so many steps involved.

With drying times (and several other things going on), this project took me two days.

A few months ago my friend Judy handed me an empty oatmeal container and asked, "Can you make me a steampunk yarn holder out of this?"


She'd just given me a ton of gorgeous beads so how could I not want to reciprocate and do something nice for her? Since then, the container has been staring at me from my floor while I pondered the materials I would use to transform it. This weekend, it all came together.


To thoroughly cover the original container design, I used a scrap of white, paintable wallpaper. Wallpaper? Yep! Kimm gave me the idea - check this out.

I traced my container onto the back of the wallpaper with a pencil and carefully cut out the size I would need.


Using regular white glue, I poured a lot on the back of the wallpaper. I probably could have used water to moisten the pre-glued wallpaper, but considering I am applying this to cardboard, I didn't think that would be a good idea.


Once the glue was spread I carefully lined up my container and rolled it along, pressing firmly to make sure there were no bubbles. Once it was on, I walked away and let it dry for a few hours.


When I was sure the glue was dry under the wallpaper I took a razor knife and trimmed the excess paper around the plastic area where the lid goes. If you don't do this, your lid won't snap shut properly.

Then I made a wash (part paint, part water) out of two colors of acrylic craft paint - burnt umber and metallic gold. I only used a few drops of the gold paint since I wanted a subtle sheen. I applied the wash with a large brush and let the first coat dry. Then I came back and brushed on a second, heavier coat, blotting at it with a paper towel to leave some places a little darker and to make the design have more depth and a more aged look.

I then let the whole thing dry overnight.


Though glued, painted, and dried, the wallpaper is still a bit fragile and I applied two coats of spray can clear sealant to protect it.

Now for the lid! I have a great piece of scrapbook paper that looks like leather so I traced the lid onto the back of the paper, cut it out, and mod podge'd it onto the top of the lid.


Once the glue was dry I gave it two coats of clear sealant as well.

Now for the embellishments! Steampunk style, being inspired by Victoriana is meant to be functional but gorgeous and detailed at the same time. This in mind, I dug out the trims and tacks. The points on the tacks were too long - they would have poked all the way through the container, so using some heavy duty wire cutters, I snipped the sharp bits off and dug out the glue gun.


I applied my embellishments to places where they could be functional as well - such as added reinforcement to hold down the seams. All the embellishments were hot glued.


Then I cut a hole through the lid using a razor knife so that the yarn can come through and the container doesn't have to be open. I would have liked to put a gromet there, but I didn't have any. *sad face*

And just for fun I added "knit" and "purl" with stickers that look like old tyepwriter keys.


Take a look at the finished product:


It's also a good idea to take a lightly damp cloth to the interior of the container to remove any oatmeal dust left in there.

Technically there is nothing steam powered about this, but it does have a "period piece" look to it, right?

If you decide to make your own oatmeal container yarn holder, be sure that, whatever materials you use to cover it, they are sealed, protected and functional. And most importantly - let your imagination go wild!

Wednesday, April 8, 2009

Just call me Molly Maid

There's a service called Molly Maid and that's what I've been playing at this week. My mom had shoulder surgery last Friday and I've all but put on the little white cap and apron. So if you notice me being conspicuously absent in getting back to comments or posting - that's why!

I'll leave you with a few photos I snapped during our four glorious days of mid-seventies weather we just enjoyed - so fleeting, yet so wonderful!


Have you ever smelled a black currant? Oh my! It smells so good!


Really fruity and fresh.


I feel the urge to go smell them coming on.


The honeybees that live in the oak tree were


happy to see the sunshine too.


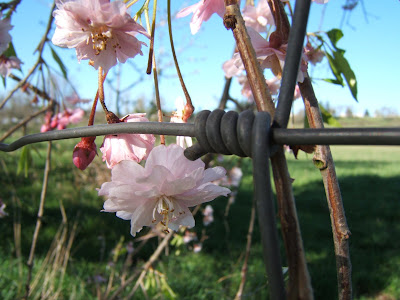
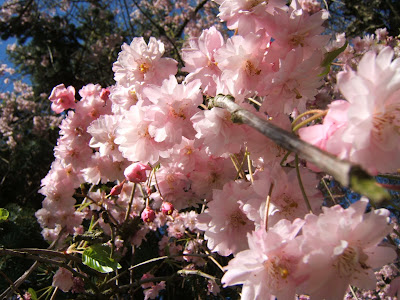
And the weeping cherry is about to burst into color - it's my favorite tree.


If you click here, you can take look at the earrings I just listed in my etsy shop that were inspired by it.


Tuesday, April 7, 2009

Baby shower goody bag

I mentioned last week how I was working on several projects but they were mostly for my friend Karen and her baby shower. She's finally received it all and now I can post about it!

I was browsing through blogoland and stumbled upon Homemade by Jill and she had several projects especially for hospital trips and baby delivery - so many great ideas to make a hospital stay a little more comfortable. Such as.....


Grippy socks! Keep your feet warm and prevent you from sliding around on those smooth floors. All it takes is a pair of socks and some puff paint. I then followed a natural design on the bottom of the socks. Her tutorial on socks is here. I already had plenty of puff paint in the craft room but I singled out a bottle that proclaimed it could stand up to all kinds of heat (like in the dryer) and wouldn't crack.

Also on her blog was a stretchy headband (shown in my photo with the matching zippered pouch I made)


Yeah, yeah, I keep saying I'm not a sewer. Well if you'd seen the dither I worked myself into just to make these little projects you'd believe me. Thankfully I had an avid quilter to help me out. Anyway! Her tutorial on the headband (click here) is simple and easy enough to follow. I'm even considering trying another one...*gasp!*

To include in the package deal I also made a small bottle of lotion and some lip balm. I don't know about you, but if my lips and hands are dry I will go crazy.

I made them using a kit I had and it was super easy and actually a lot of fun. Not a lot of work involved, but great for amateur lotion and lip balm makers. I did decide against using their scents they included since they were so strong and instead used none in the lotion (it's shea lotion so it smells good by itself!) and some soft, rose petal scented essential oil I had for the lip balm.


Once I had all the goodies I knew I wanted to corral them in something that would be easy to carry so that's how I ended up designing the zippered pouch. I gathered the goodies together and measures about how big I'd need it. Then I cut the fabric and liner and sewed everything together...with a lot of help. You know how projects always sound so brilliant in your head and then you get to actually doing it and realize it doesn't work that way? Yeah.


In any case it all came together (and coordinates in color even!) so I hope Karen can get some good use out of it!


Thursday, April 2, 2009

Flowered headband

This project


**Edited April 5th**


I've seen these everywhere and totally wanted one. Part of the rule about a strict budget is not spending your money on frivolities. Guh. So I finally got fed up and decided to make myself one.

I looked online for a tutorial for making the flower and couldn't find one (I have since found tons, I don't know what my problem was before!)

I decided I was a smart enough person that I could figure it out for myself. Well...I didn't know how to start - ha! So I remembered seeing this post and decided to see how she did hers (she makes adorable stuff!). She got me started and I semi-deviated from there. If- and this is going to be a riot considering I'm not a sewing person - you want to come along with me I'll show you how I did it.

My starting supplies of what I thought I would need:


Two fabric selections in coordinating colors that match the headband I already had. Some satin ribbon and some tulle. You'll also need felt, a needle and thread and some tacky glue (if you do it like me.) I didn't end up using the ribbon at all.

I started out by cutting a circle template onto paper, cutting it in half and then pinning it to the fabric and cutting around it.


I wasn't sure how many I'd need, so I guesstimated and ended up cutting ten, but I didn't use them all. It's really your discretion, how many you can fit and how full you want it.


Taking my needle and thread I stitched through the bottom and then pulled the thread tight to gather the "petal" - on the same thread I continued until I had enough to look like a flower.


Then I stitched the last two petals together to keep it from falling open.


I really didn't know what I was doing when I did it, just making it up as I went along. And like I told you I am not a sewer! So if I can make this work then so can you!

To make the rest of the flower I cut a circle of my second fabric choice, making sure it was larger than my gathered petals. Once it was cut round, I freehanded some "waviness" to it so it didn't look so stodgy (I did that after the photo). I did the same with a piece of white tulle (not even in the photo). The felt I cut slightly smaller because I don't actually want it showing, I just need it for stability and to attach the whole deal to the headband.

Then I stitched the petaled portion to the wavy background until it felt secure to me. Real technical and professional, me. *wink*


To attach it to the headband I rethreaded my needle and figured out where on the headband I wanted it. Then I stitched through the felt on each side of the hadband all the way up and down and a few more random times until it felt nice and secure. I ended up gluing the tulle and background fabric to the felt - didn't get any photos of this, sorry!

And then you're back to my intro photograph! That wasn't too hard was it?

I'm thinking about covering a little button with fabric and making that the center of my flower but I don't want it to look like a button...hence the fabric part. I dunno. I may have to think about it. Hmmmm. Ponderment.....

**Edit**

I did indeed cover a small, normal button with fabric. Just slapped on some tacky glue and stuck on the fabric. Then I sewed it into the middle of the flower. I have to advise though, that with the many layers of fabric including the last one hardened with glue, it wasn't super easy but I like how it looks!


And do you just love my grow-out? I can't for the life of me decide if I want to continue coloring my hair or not...so I just do nothing instead.