
I knew that calling it a "cup cozy" would
not work with the word "manly" also in the title.
I craft almost every gift I give and that includes trying to figure what to make a guy (if you want to read my poetical woes on that count, go
here). Is it just me, or is it really hard to make stuff for men? Besides food I mean. The men I know like cars, engines, mud, tires, chrome, trucks, and things that go
vroom-vroom!
They also like coffee, maybe because it makes them feel like they go
vroom-vroom! as well. To combine those elements I devised a plan to make a java jacket that looked like a muddy tire tread.
First you'll need a cardboard cup cozy or a pattern for one. I *had* to get myself a latte in order to get mine. Ah darn.
Placing it over brown felt, I traced it twice using a black Sharpie. One piece will be for the front, the other for the backing.

To make the tread pattern I studied a bunch of tire tread photos and decided this is the basic idea. If you draw a mountain/pointy tooth line as long as your felt needs to be, you only have to cut once down the middle and then a second time on the other edge, therefore making two pieces with only two cuts. Clear as mud?

If you line up your pattern close enough to the edge of the felt you only have to make two cuts instead of the three I show in my really sophisticated drawing done with MS Paint.
Once you have the outside frame, cut a strip of black felt approximately 3/8 of an inch wide and snip it off in 5/8 of an inch long pieces. I ended up needing 25 of these pieces. These will make up the center of the tread and should be laid out in a spaced out herringbone brick sort of pattern.

Like the above super sophisticated drawing done with MS Paint, not like the spaced out brick below.

Using felt glue to hold the pieces in place until they can be stitched, lay out the pattern like so.
Because mine wasn't exactly measured I had to do a little trimming and wiggling around to get everything to fit.


Once everything was glued and dried I used embroidery floss that I divided in half (three strands instead of the full six) and stitched each rectangle and peak in the pattern shown below with the white dots. It's a
lot of stitching, but this is for a man and I haven't known one who doesn't manage to tear up their things with regular use.

Not exactly pretty but you can see how sturdy I wanted to make it. It won't matter as it'll be covered up with backing anyway.

For a fabric java jacket you usually need a button and loop closure or Velcro. Since the cup size is likely to change, I went with button and loop - making the loop out of an old elastic hair band to allow for adjustability.

Using my felt glue and some clothespins I placed the end well inside to make sure it won't accidentally pop out when in use. When it is dry, apply several stitches around it (hiding them in the black felt on the front).

Next, sew on your button of choice and make sure it is sewn on
very well. I placed mine about 2 and 3/4 inches inside the edge - this will keep it taut on smaller cups but still allows for adjustability to larger cups as well.

Once the elastic and button are stitched you are ready for the backing to go on. This is going to hide all your stitches and add an extra insulating layer.

I cut my backing 1/4 of an inch shorter than the front piece, applied felt glue and stretched it out and held it in place with clothespins while drying. Cutting it slightly shorter and stretching it should prevent rippling in the felt when it folds around the cup.

I then used my divided embroidery floss to blanket stitch the back and front pieces together.

And there you have it - a manly java jacket combining two of man's most beloved things: coffee and muddy tires. :)

Linking to:
Creative CatsToday's Creative Blog
Best of 2010 by House of Grace


 Plus it usually clears up towards evening and gives me a pretty sunset to watch.
 Last year a Killdeer (a bird) nested in the driveway near the neighbor's house. Can you spot the nest?
 They are quite cleverly disguised but we can usually tell where one is before we come too near to stepping on it because the mother will put on her brave "broken wing" act to try and draw us away.
 This year one has nested practically in the backyard. I hadn't seen the nest yet, but knew she was there because her cries of killdeer come from the same spot. Camera in hand I went hunting...and found mama holding perfectly still, watching me and moving only when I moved.
 Brave little mama. I tried not to stress her too much while I was there and used my sad little zoom which is why it looks so blurry when I enlarge it.
 She was smart and gathered some moss from my fallen oak tree to pad her nest.
 I have never yet seen a young Killdeer - they can take off right after hatching! Maybe if I keep my eyes on this one...


 What about the inevitable laundry? Keep it contained with this laundry bag by the
  Or try this clever idea from
  Let's not forget the important stuff! I would love to buy some plain metal tins and label them with these colorful and whimsical labels from
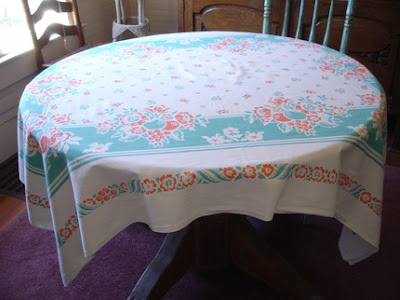
  We use a pretty unsightly folding table but we could make it cute (and clean!) by using a vintage tablecloth. Check out thrift stores, garage sales or etsy shops. This one from


 Using the same scallop circle punch and my larger smooth circle punch I cut pink and lavender paper and embossed the birthday girl's name using some "Vintage Rose" Distress Ink embossing powder.

 The other dangles in the window were made using more ribbon-on-hand and some pretty paper cut out with my paper punches and layered. These seem to be popular in party decor as well. They are so simple and I really liked the extra touch they added to the window.

 I also put together a couple of dishes made from dollar store stuff because I've seen it done everywhere and just really wanted to try it. For some reason my dollar stores (yes every single one in my area) hate me and don't sell the same stuff they appear to sell in every other state and I had to make do with these.
 The birthday girl's mom bought dishes at Ross and Dollar Tree to use for platters and bowls and I brought along the cake plate I scored in a garage sale free box along with the candy dishes I made.

 Of course we had goodies left over and since I stayed a few extra days to clean up (and to have fun and visit) there was much sampling of the leftovers. So much so that I was inspired to make a little drawing.


