Friday, January 30, 2009
One day I will...
Isn't it great when you have a list of to-do's and get to take your pen and put a big fat checkmark next to it? Ahhhhh. I just love that!
I'm half-way through the first book on my reading list for the year - books I want to read, not books loaned to me and I feel obligated to read (not that all the loaned books were bad!).
Nicholas Nickleby, by the way, is fantastic. Charles Dickens had a great sense of humor. There's a whole bit at the beginning about the "United Metropolitan Improved Hot Muffin and Crumpet Baking and Punctual Delivery Company" that just had me rolling!
The book is a fair-size larger than I anticipated when I added it to my list and I don't get to spend a lot of time reading - shockingly crafting and reading don't work at the same time! - but I think I've made some good progress.
I also opened up my etsy shop! Woowoo! After months of procrastination it just seemed silly to put it off any longer. I don't have a ton in there just yet, but it's nice to have something there and check it off my list. And of course there's a link to it over there on the right...
I also was able to complete some commissioned jewelry that I've been working on for weeks as well as finish a couple of Christmas gifts - you heard me right - that I haven't been able to give yet.
And since I've been on such a roll I decided to try my hand at do-goodery.
Yesterday I wrote an e-mail to the local paper and asked one of the reporters to please write something about the CPSIA law that will be having such a deleterious effect on so many. I live in a small town and the local paper isn't much, but if it gets the community involved in fighting for an ammendment then I'll have accomplished something!
Recently one of my former students sent an e-mail to check out her Relay For Life page - she's joined the committee as luminaria chair and the youth recruitment sub-chair and has the school's Key Club involved. She's a go-getter! Unfortunately with my freelance bum status I am unable to donate money to support her efforts. Instead, I am making beaded bracelets and selling them, giving her 100% of the proceeds. I'd like to be able to donate at least $100 dollars but more would be fantastic! If you are interested drop me an e-mail at mollythepirate(at)yahoo(dot)com. I'll be posting more on the subject later.
All that and I have my blog posts all planned for the next two weeks - how's that for organized?
Yep, I'm making checkmarks like a fiend and enjoying every minute of it.
Wednesday, January 28, 2009
More firsts and ideas for packages
If you read Monday's post you know I've been talking about all the projects I've tried for the first time. The next thing I tried was cardmaking.
I don't have a bunch of the fancy tools that hardcore cardmakers and scrapbookers have so I had to make it up as I went along.
Inspired by Karen's insane cupcake book (her description, not mine) I decided that would be a perfect thing to put on the front of the card.
I knew right away I wanted the frosting to sparkle because ever since I was a kid I've loved things that sparkle. Don't card cupcakes seem like something that should be sparkling?
I freehand cut the "frosting" and coated it in glitter. I also freehand cut the "cake" and "wrapper" part of the cupcake. I tried - on a sample piece of paper! very important! - to see what drawing on the ridges would look like. Uh. Yeah. Not good. Now what? Heehee! You'll never guess! I stole a tube crimper out of the shop (not the craft area, the fixing cars area) - mechanics, etc. use them to squeeze all the stuff out of tubes and each side of the rollers happen to have a crinkle cut. I stuck my cupcake bottom in there and turned the knob - out came perfectly crinkled cupcake!
With the bottom having actual texture to it, my frosting wouldn't fit so I glued a piece of foamy stuff on the bottom so it sticks up a bit and gives it some dimension.
For the second box I just made a pom pom and attached it with a tag with funky cut edges and another piece of scrap ribbon to a pre-made Chinese take-out gift box. I love the red and silver.
I don't have a bunch of the fancy tools that hardcore cardmakers and scrapbookers have so I had to make it up as I went along.
Inspired by Karen's insane cupcake book (her description, not mine) I decided that would be a perfect thing to put on the front of the card.
I knew right away I wanted the frosting to sparkle because ever since I was a kid I've loved things that sparkle. Don't card cupcakes seem like something that should be sparkling?
I freehand cut the "frosting" and coated it in glitter. I also freehand cut the "cake" and "wrapper" part of the cupcake. I tried - on a sample piece of paper! very important! - to see what drawing on the ridges would look like. Uh. Yeah. Not good. Now what? Heehee! You'll never guess! I stole a tube crimper out of the shop (not the craft area, the fixing cars area) - mechanics, etc. use them to squeeze all the stuff out of tubes and each side of the rollers happen to have a crinkle cut. I stuck my cupcake bottom in there and turned the knob - out came perfectly crinkled cupcake!
With the bottom having actual texture to it, my frosting wouldn't fit so I glued a piece of foamy stuff on the bottom so it sticks up a bit and gives it some dimension.
I still think the candle looks like a lighthouse but hey, I learned stuff.
Once you've gone to all this trouble to make things and make them pretty, you don't want to be sticking them in just any old gift bag or box. So to make it interesting, and to also make do with what I had - which was a Christmas clothing box with snowflakes and tapemarks all over it - I covered the box with brown paper and stamped a pattern all over it. I really recommend stamping the paper before you put it on the box (ancora imparo, right?). Then I grabbed some ribbon scraps and attached them to the box as well. For an extra embellishment I made a pom pom, thanks to Martha's instructions, and attached it to the top. I completed the look with a freehand cut, layered leaf-shaped tag. Now it's personal!For the second box I just made a pom pom and attached it with a tag with funky cut edges and another piece of scrap ribbon to a pre-made Chinese take-out gift box. I love the red and silver.
My first real attempt at cardmaking, my first stamped wrapping paper and my first pom poms - check!
Monday, January 26, 2009
There really is a first time for everything
I don't like making gifts that aren't specifically for a certain person. Like mass quantities of the same thing and then doling them out with no personality put into them. Every hand made gift from me was thought out and made with love. So what did I do when I already exhausted my creative stores to make a friend's Christmas gifts and her birthday is mid-January? I poured over craft blogs and websites looking for ideas.
If you have a craft blog or website I thank you from the bottom of my heart for putting your ideas out there!
Thankfully, I already had one big item in the works since October - a blanket knitted with a variegated lavender bouclé. Knowing I just don't have the attention span/ability to yet make an item that large with a complicated pattern, I used plain knit. And with only two mishaps of children yanking half my stitches off the needle I did finish in time! I hope she gets lots of snuggling out of it.
My first big knitted blanket- check!
Karen also loves black and red combinations and Asian-inspired home decor. She and her husband have a new house and she's hoping to do her living room with that in mind. So I got myself over to Folding Trees and tackled the kusudama tutorial.
I am totally new to origami but their tutorial was perfectly simple to follow. My only problem? Not enough pretty paper in the colors I needed. Not to be set back by something so simple as having no supplies (haha) - I grabbed a stack of printer paper and stamped half the amount I needed with red and half with black. Problem solved! The kusudama went together great and I have it dangling from a black satin cord.
My first kusudama - check!
Recently Karen told me about having fond memories of lilac perfume and wondering where she could get some today. I stored that away and pulled it out for the occasion! I took a lovely, intricately patterned, pewter perfume bottle I already had and decided to make my own perfume for it. I already have quite a stash of essential oils bought from a local man, and as luck would have it I had a lilac one in there!
Using several online sources (which I apparently didn't bookmark *sheepish face*) they all said that vodka was the perfect vehicle for home made perfume. They usually suggested a percentage of essential oil to alcohol but I have to admit I winged it and just kept mad-scientist mixing until it smelled right to me. If, like myself, you aren't a drinker, liquor stores have tiny little bottles for around a dollar.
My first home made perfume - check!
I also included a hand-beaded bracelet as well as a glass snowflake ornament - the only purchased item of the bunch! Now for the wrapping... which will be in Wednesday's post!
Friday, January 23, 2009
Photo art - the L'Amour edition
I've never had my pockets bulging with money, so to spice up my living spaces I have to come up with things that will feel like home and not feel like "ow" to my wallet. One of my favorite ways to do that is through photos.
I have seen a home where tiny, regular sized photos in frames are...well...cluttering up an entire wall. Not exactly what I had in mind by homey! I didn't want to spend a lot of money on having enlargements made either. Instead, I took my photo to the local copy shop and had color photo copy enlargement made of a photo of a certain mountain meadow in my favorite camping spot.
Nowadays (am I old enough to say that?) photo enlargements aren't so spendy or difficult to come by, but they can sometimes add bulk to a project that will really cramp my creative style; so color photo copies are still my favorite way to go!
Well I have photos all over the place, how do I make it different and interesting? As Hamlet said, "Words, words, words!"
I took one of my favorite Louis L'Amour quotes and had the print shop print it on a piece of vellum which was standard paper size (this would be easy enough to do at home). Then I lay the vellum quote over the photo, cut a ribbon border to cover the seams of the the obvious "hey there's a coupla pieces of paper in this frame" and put them all in a frame that I either got at Goodwill or on clearance (my frame choices are always those options!) and backed it all with black paper.
And you're done! Nearly instant art for nearly no money.
And because I doubt your eyes work well enough to read it from the photo, here's the quote I used, which is from Treasure Mountain of the Sackett series:
I don't know what you are wishful for in this life, but you set down of a night and you pray to God that he'll let you walk alone across a mountain meadow when the wild flowers are blooming.
You pray he'll let you set by a mountain stream with the sunlight falling through the aspens, or that he'll let you ride across an above-timberline plateau with the strong bare peaks around you and the black thunderheads gathering around them - great, swelling rain clouds ready to turn the meadows into a swamp in a minute or two...you let him show you those things, and you'll never miss heaven if you don't make it.
There's majesty in those peaks, and grandeur in the clouds, and there's a far and wonderful beauty in the distance.
Wednesday, January 21, 2009
Blending in unsightly storage
Ever wish you had something other than what you had? (Who am I kidding?)
I've been recently motivated to clean and organize by some posts at maya*made - and things are looking much better! Problem is, I find myself wanting things I don't have available to me. *shakes finger at self*
Like when I took a look at my cat food storage.
I've been recently motivated to clean and organize by some posts at maya*made - and things are looking much better! Problem is, I find myself wanting things I don't have available to me. *shakes finger at self*
Like when I took a look at my cat food storage.
Blahhhhhh.
Functional, sure! But does it have to stick out like a sore thumb and be so....ugly?
Well actually, no it doesn't!
Now I have motivation from maya*made and inspiration from The Steampunk Home (where they bring innovation and Victoriana into the 21st century) - how to apply that to modern plastic?...
I have tons of acrylic craft paint at my disposal as well as tons of wrinkled and crinkled tissue paper left over from Christmas, so I gathered those items and set to changing my storage from sterile to steampunk.
Using decoupage glue I tore the super-wrinkled tissue paper into workable pieces and glued them haphazardly onto the container in layers. Overlap? Who cares! Bubbles and wrinkles? Who cares! It will look better with those "flaws" in the long run.
While I waited for that to dry I took the lid outside and masked off the handle and side flaps which lock the lid in place. Then I painted the lid with my little can of gold spraypaint which amazingle still had some left after...two, three? projects I've already used it on recently. Once that was dry I dug out some bronze metallic craft paint and sponged it over the gold to add a patina. Once both layers were dry I applied a clear coat sealant making sure all the while that none of this paint gets onto the inside of the container (it is going to be food storage after all).
With the bottom half dry I mixed Burnt Umber and the metallic bronze acrylic paint and sponged onto the lid using a wet sponge. The wet sponge will allow a little more movement to the paint and a lot less thickness. If it doesn't come out as dark as you like (like mine did at first) simply apply another coat!
I also applied a layer of clear sealant to the bottom - it is just paper after all.
The finished product blends in nicely with the existing decor and is still just as functional as it was previously.
It's still lacking a little steampunk style though, so I'm toying with the idea of adding some brass "tacks" or some kind of decorative flourish to add a little elegance. We'll see!
Monday, January 19, 2009
In the bleak midwinter - wrap up in something cozy!
I can't turn a blog corner lately without running into some kind of wardrobe overhaul post encouraging women to get rid of frumpery and dress nicely, with femininity and modest style. If you are at all like me sometimes I just can't find the sort of things I would like to wear. There may be this image in your head of what you want, but where to find it?
Well I've heard "if you want it done right, do it yourself," so I did!
Did what? Did what? You all ask, eyes shining with excitement (haha).
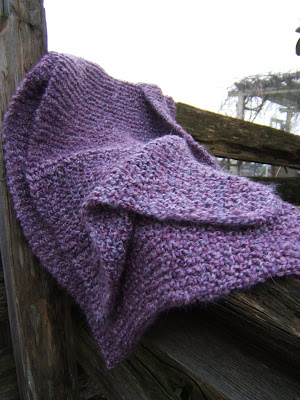
I made myself a super-soft and touchable, comfy and warm shoulder wrap. Oh sure, I've seen them all over the place now, but do you think I could find one at the time? Besides, I made it myself and I can have the pleasure of that accomplishment.
I used a homespun yarn and plain knit stitches (I should mention that I am quite an amateur knitter and until recently have been too chicken to try any stitch besides the plain knit.) on size 13 needles and knit it about 16 inches wide. Then I just knit away until I could comfortably wrap it around my shoulders and have plenty of excess to dangle around my arms or flip over my shoulder in dramatic fashion, or what have you.
It is amazingly warm! I was recently fogged in for three straight days and it kept me cozy as I wandered around the yard, camera in hand (proof at top).
So next time you find yourself in a wardrobe quandary, bemoaning the fact that no store has any taste whatsoever or they would have exactly what you need, try making it yourself. And if you aren't yet brave enough for that you can always try etsy.
In The Bleak Midwinter became my new favorite song this Christmas as I was listening to the Sirius Christmas Pops station. I can't believe I'd never heard it before! If you haven't heard it either, you really should.
Friday, January 16, 2009
Home decor improvement
I love to decorate and make things cozy. I've mentioned previously how much I love vintage and well-loved items; I'm a bit of an old-fashioned girl I guess you'd say. That in mind I still have some copies of VHS hanging around my place that I haven't upgraded to DVD and can't bear to get rid of them yet but I don't care to see them cluttering up things. My DVD's fit nicely into a zippered binder (something similar to this) and the boxes all go into the recycle bin. I have Megan to thank for that lovely and super space-saving gift!
Thankfully most stores realize most people don't want to see their clutter and offer some options. I picked up some plain brown storage boxes at a craft store for $1.99 each on sale. The neutral and natural color went well enough with my neutral natural decor (how natural? I have tree limbs on my walls) but they just weren't quite it whatever it was.
Solution: using a sponge I applied some acrylic craft paint in a taupe shade very like the boxes themselves so that when I was finished they had a suede look to them. Then I took a thin paint brush and some white paint and made "stitches" around all the edges. Now I have lovely "stitched leather" storage boxes *wink* for my media clutter.
A storage solution with style. Much better!
Wednesday, January 14, 2009
My darlin' Clementine!
Starting in early December I start craving citrus. I'm not sure if I've been conditioned to this by those evil geniuses at the grocery store or what. Whatever it is, I usually go through several boxes of clementines to satisfy my cravings. (It could certainly be something worse!) Thing is, I end up with TONS of peel left. Mostly it goes on the mulch pile but since I've been so desirous of late to turn my previously useless items into useful things (and okay, because of this recipe) I decided to do something with some of those peels.
The recipe I linked actually calls for lemon peel, but I have to say the orange peel was good! I made sure to scrub the outer skin well and scrape away the pith before I chopped it up.
Whatever peel I didn't want to get so involved with was sliced or cut into squares using kitchen scissors and left on trays to dry. The dried portions will go into potpourri or sachets and the stuff I took more time with will make my recipes yummy!
Now I not only satisfy my cravings but get to enjoy the fruits of a little more labor.
And if you didn't get an earworm from my post title, try this.
Monday, January 12, 2009
For the book lovers
If you stick around long enough you'll find out how much I love books. So it was quite natural when my love of books collided with my new obsession passionate interest in paper crafts. Thanks to Folding Trees I've had a lot of fun trying new things! One of those things being these cute little origami book corners.
I'm new to paper crafting so I don't have stacks and stashes of fun and beautifully patterned paper to work with. Instead I snagged my enormous pile of Christmas catalogs that have been filling up my magazine basket. I went through each catalog and tore out pages containing large images with interesting patterns or "textures" in the advertised wares.
Using a pre-cut 2x2" square of construction paper, I traced around the square over the desired portion of the image with a sharpie and then cut out all my traced squares by hand.
I admit I felt a little daunted looking at the huge stack of colorful squares but before I knew it I'd made fifty of them! What can I say, I got a lot of Christmas catalogs.
I not only had fun, learned a new craft and made something useful but I recycled while I did it. I'm waiting for my award to arrive in the mail any day now, haha.
And just in case you were curious, the lovely book model featured above is The Man From the Broken Hills by Louis L'Amour - one of my favorite authors.
Friday, January 9, 2009
What's your sign?
Raise your hand if you don't have a decoration on your wall that exhibits words along with some kind of artistic imagery.
...
...
*crickets chirp*
...
...
I thought so!
The thing is, signs are a great way to express sentiments or reminders of encouragement for ourselves and all who visit. They are like little plaques saying, "This is who I am."
In some cases they are used as labels for not just the contents of our heart and mind but the contents of our home. What kind of things do you love and surround yourself with? That in mind I created this for my friend's mom, Judy as a birthday gift. (she's my friend too, not just "my friend's mom"!)
...
...
*crickets chirp*
...
...
I thought so!
The thing is, signs are a great way to express sentiments or reminders of encouragement for ourselves and all who visit. They are like little plaques saying, "This is who I am."
In some cases they are used as labels for not just the contents of our heart and mind but the contents of our home. What kind of things do you love and surround yourself with? That in mind I created this for my friend's mom, Judy as a birthday gift. (she's my friend too, not just "my friend's mom"!)
This was made after I came up with the photo art project I posted a few days ago using the photo of my parents. And you know from my previous post that I like old junk vintage treasures and so I came up with a word combination, font style and finish that would represent that. It's a bit tongue-in-cheek with the "miscellany" followed by "etc." but I like a little humor in everyday things.
Doesn't this pretty much describe what's in your home? It sure does mine! Although I'm not sure which I have most of - books or miscellany. I even have a book about miscellany. [Yeah really] I may have to make one of these for myself!
Thanks to picnik, my printer, some scrapbook paper, some "distress ink", a piece of balsa wood, a razor knife, jute string, duct tape and plain brown paper I have a fun little gift. And all put together with love, humor and personality - that's always a good sign.
Thursday, January 8, 2009
Making old stuff look even older
Usually people are all about the shiny and new and we know how I love a bit o' shine, but I am actually quite the fan of old junk...I mean...collectibles.
Vintage, distressed, shabby chic, what have you, I'll probably love it. However that is usually the last thing people want in a cell phone.
My cell phone is already considered "old" simply because it doesn't have so many features that even basic models now have. However! Mine has flashing lights when it rings that make me feel like I'm playing pinball and I love it. I am easily amused, what can I say?
My last two phones have been hand-me-downs from my friend Karen without whom I probably wouldn't even have a cell phone at all. *applause for Karen if you please* With the current phone I now have she also provided me with a cute new cover and side bumpers so that the phone would look all shiny and new for me. That was two years ago.
Once I got into the idea that a person could make steampunk style for everyday objects I desperately wanted to try it. [I can't decide what I like the most about steampunk - the stylistic aspect, the literary aspect or the historical aspect.] And if you are completely confused and don't even understand the terminology I'm throwing about willy-nilly, please see this earlier post.
Thankfully because my cell phone is oh-so-aged it is also quite easy to disassemble. Two pieces make up the front and back and rubbery plastic see-through bumpers on the sides also come off.
Before painting (or disassembling for that matter) I checked to see which nooks and crannies would be adversely affected by a layer of paint. These areas, like the camera phone lens opening and front screen lens opening as well as a back side button which disengages the case so you can get into your phone's inner workings, I taped off with painter's tape. All the insides of the phone as well as the keypad I put to the side in a safe and dry location.
To steampunk the phone I bought two mini cans of spray paint, one in gold and one in copper (I couldn't find a brass color at the store I was in). First layering on a thin, even coat of gold and allowing to dry and then a thin, even layer of copper. Because of the very smooth and plastic surface you have to take care that you are making thin coats so your paint won't fish-eye. Using a spray paint specifically formulated for plastic would be best, if you can find it in the color you need.
I did have to paint about four layers on both the front and back pieces, making sure to get all sides and little nooks and crannies. Once the paint was on, I layed out in pattern a set of art-nouveau style stickers in gold that I had found at the craft store. Then I carefully removed their backing and applied them, then spraying three layers of sealant allowing each to dry between times. When I was done with the painting, sticker application and sealant I left the pieces alone for a few days to make sure everything was cured.
During the "waiting time" I took the plastic side bumpers and traced around them onto a piece of muslin fabric leaving a little excess just in case. The natural tones of the fabric and the thickness (or rather lack thereof) would both fit with the steampunk style and still allow my beloved flashing lights to show through (feel free to roll your eyes at me).
The color of the muslin wasn't quite dark enough for my taste so I poured a cup of coffee and soaked my pieces in it for several hours. I removed them from the coffee, rinsed, dried and ironed the pieces. Using some tacky glue I applied the fabric like you would upholster something - tucking in the edges and corners. Once they were dry everything was ready for reassembly! Hopefully if you tackle a project like this you won't forget how it all goes back together in the time it takes you to make over all the pieces.
It could certainly be more steampunk style, but it was a first project and got me over being scared to try it - and it didn't turn out too bad!
Wednesday, January 7, 2009
Some people see shapes in clouds...
I apparently see shapes in rocks.
This summer I was working in the garden when I caught a light-colored rock out of the corner of my eye. I picked it up and brushed away some of the dirt. It wasn't like most of the rocks I've picked up and thrown out of the way (and there have been an almost literal ton) it was an interesting...finish...I guess you'd say; not porous. Plus it looked remarkably like the shape of a charm I'd put on a bracelet I gave to my mom one year for her birthday.
My mom has always rallied to her children's aid when there was trouble. "Mama bear syndrome" is what she called it - you don't mess with the cubs of a mama bear. Because of that, and a pair of ceramic bears (mama and baby, which are discontinued - the bears shown are similar though) that I spotted in a Coldwater Creek catalog one Christmas, I have been giving Mom "mama bear" stuff for gift-giving occasions. The aforementioned bracelet with a dangling bear charm and finally the pair of ceramic bears that initially inspired me.
Once I saw the rock in the garden I knew it would make another perfect addition to the Mama Bear collection and I stuffed it into my pocket and later sat it on one of my many bookshelves. About three months later, I finally got it down and washed it thoroughly then allowing the surface to fully dry. Using a paint pen in black (although a Sharpie would probably work just as well) I traced over my previously pencilled on lines that mimicked the design from the bracelet charm bear. I stuffed a repurposed and redecorated box (number 3) with tissue paper and made a card insert and there was the gift (everything in matching tones of course!)!
How easy was that? Easy, free, and yet meaningful.
Next time you are out and about, take a little time to look downward and see what shapes you can find. Your rocks may not be jumping out to you as animal shapes, but an interesting rock with a non-porous surface would be a great place to write a word or message important for you to remember. Try the fruit of the spirit, encouraging words or even Latin sayings. Then keep them in bowls or trays or give them away.
Tuesday, January 6, 2009
Photo art
Is it possible there is a project/gift idea that is cheap AND meaningful?
Wonder of wonders yes it is possible! (That is your cue to shout for joy in an effusive manner)
I've mentioned a few times, and probably will a few more since it vexes me so, how difficult it is to make something for a guy. Maybe it's just me - if it is just me I wish someone would give me some ideas! *hint, hint* - but I simply cannot come up with something he would like that I can actually do. I'm sure he would love a project where I had to weld something together or fabricate something out of diamond plate, but I would not like to see what the end of that trial would look like. "Merry Christmas/Happy Birthday here is your blob if ill-fitting mess! I call it 'modern art'."
So what can I do? I like to be crafty and I like photography - that sounds like a plan to me! Some photos in themselves are enough art, but others might just be a snapshot and need a little help. I did a little digging and found an adorable photo of our parents sitting in a hot-rod little car about to go on a date (approx. 1963). I scanned the photo and uploaded it to picnik where I could clean up the image, add a border, add some words or even change the tint.
If you can't decide what you want your photo to say (if you want words at all) try a movie quote, historical quote or an old adage or proverb. The one I chose happened to be from the movie American Graffiti.
If you are lucky (and have a doctorate) you might have Photoshop and know how to use it. I, however, am satisfied with the free programs that don't make me feel like a monkey doing a math problem.
After editing the photo to my satisfaction I saved it to my computer and then a disk and took it to the print shop in town where I was able to tell them the size I wanted and have it printed on quality paper. You could probably have it printed on photo paper, but I needed something that was thin.
I measured the size of my new photo print and cut a 1/8 inch sheet of balsa wood to size and sanded the edges.
Using a paper cutter (not scissors, unless you have a nice, steady hand and the ability to eyeball straight lines) I removed the excess paper from my image. Using decoupage glue I started at one end of the image and glued as I went, making sure to keep it straight. If you try to do the whole image at once, your glue may dry out before you get to the end.
If you are not into power tools (I admit I had mine cut for me) you could even use a sturdy cardboard as long as you covered it before you applied the photo. We want the project affordable, not cheap looking.
Now for the hanging mechanism. Because the wood and paper are so lightweight, there's no need to drill holes for wire. What I did was cut a piece of leather cord to size and duct taped it to the back. You could use satin cord, jute string, or wire - whatever would look best with the image you've chosen. Now, please don't leave those strips of duct tape visible in the back! Cover the back with a piece of plain brown paper the size of the entire piece of wood. If you don't have package wrapping paper, use the blank side of a paper bag. This will cover your ugly duct tape and give you a canvas to write the occasion, year or "from" if you so desire.
It does take a few steps to complete, but is a relatively simple and inexpensive project with a wonderful personal touch that will certainly mean something to the person who receives it.
Thursday, January 1, 2009
Bookshelf
Books Read in 2012
- Becoming Elizabeth Darcy - Mary Lydon Simonsen
- Pride & Platypus - Vera Nazarian
- Against the Tide - Elizabeth Camden
- Northanger Abbey and Angels and Dragons - Vera Nazarian
- Song of the Highlands - Sharon Gillenwater
- Fly Me to the Moon - Alyson Noel
- Anna Finch and the Hired Gun - Kathleen Y'Barbo
- Impossible - Nancy Werlin
- Mockingjay - Suzanne Collins
- Catching Fire - Suzanne Collins
- The Hunger Games - Suzanne Collins
- Incarceron - Catherine Fisher
- Cinder - Marissa Meyer
- Ekaterina - Susan K. Downs
- Love in Disguise - Carol Cox
- Scarlet - A.C. Gaughen
- False Pretenses - Kathy Herman
- Submerged - Dani Pettrey (review)
- Kerplunk! - Patrick F. McManus
- Lunatics - Dave Barry & Alan Zweibel
- Miss Delacourt Has Her Day - Heidi Ashworth
- Miss Delacourt Speaks Her Mind - Heidi Ashworth
- Explosive Eighteen - Janet Evanovich
- A Walk in the Woods - Bill Bryson
- The Dante Club - Matthew Pearl
- Smokin' Seventeen - Janet Evanovich
- David Copperfield - Charles Dickens
- Sizzling Sixteen - Janet Evanovich
- The Secret History of the Pink Carnation - Lauren Willig
- One for the Money - Janet Evanovich (second read)
- Miss Peregrines Home for Peculiar Children - Ransom Riggs
- Darker Still - Leanna Renee Heiber
- Trail to Tomorrow - Carrol Haushalter
- Beauty : A Retelling of the story of Beauty & The Beast - Robin McKinley
- The Map of Time - Felix J Palma
Books read in 2009
32. A Christmas Carol - Charles Dickens
31. Though Waters Roar - Lynn Austin
30. Emma - Jane Austen
29. That Certain Spark - Cathy Marie Hake
28. The Time Machine - H.G. Wells
27. Faery Rebels - R.J. Anderson
26. Pirate Hunter - Tom Morrisey
25. Clockwork Heart - Dru Pagliasotti
24. The Thin Man - Dashiell Hammett
23. One Day in the Life of Ivan Denisovich - Alexander Solzhenitsyn
22. The Scarlet Pimpernel - Baroness Orczy
21. Scarlet - Stephen Lawhead
20. My Bonny Light Horseman - L.A. Meyer
19. Fearless Fourteen - Janet Evanovich
18. Breaking Dawn - Stephenie Meyer
17. Lean Mean Thirteen - Janet Evanovich
16. Twelve Sharp - Janet Evanovich
15. Eleven on Top - Janet Evanovich
14. Ten Big Ones - Janet Evanovich
13. To The Nines - Janet Evanovich
12. A Claim of Her Own - Stephanie Grace Whitson
11. Hard Eight - Janet Evanovich
10. Seven Up - Janet Evanovich
9. Hot Six - Janet Evanovich
8. High Five - Janet Evanovich
7. Four To Score - Janet Evanovich
6. Hood - Stephen Lawhead
5. Three to Get Deadly - Janet Evanovich
4. Two for the Dough - Janet Evanovich
3. One for the Money - Janet Evanovich
2. Nicholas Nickleby - Charles Dickens
1. The True Darcy Spirit - Elizabeth Aston
Subscribe to:
Posts (Atom)