Sunday, May 31, 2009

Goodwill transformation


Thrifty Decor Chick is having a Goodwill party! When you're done here be sure to check out the other fab projects!


I loooooooooooooove Goodwill. I'm always telling everyone it is my favorite entertainment because you will find things there that make your face turn inside out it is so weird. Or ugly. Or something. But it is by far my favorite bookstore and by far my favorite place to find those "diamonds in the rough."


I recently found these at one of the stores near me. They were .99 cents apiece and they are nice, solid wood with hangers on the back.


I'm kinda hoping there were more plaques and they got bought already. What in the world are these letters supposed to spell? When I look at them together I keep thinking "as is" and "Asia." Huh. Who knows.

I sanded them a bit and coated them with matte black spray paint. I had this gorgeously patterned paper to put on the face of the plaque but...I put off applying the paper for a few days because I have this little paintbrush to apply my decoupage glue and I was not thrilled about the idea since I figured it would wrinkle my paper anyway. Then Thrifty Decor Chick did a similar project in which she mentioned using spray adhesive - head slap! - I have a can of that stuff and I didn't think to use it! So really it was fate I hadn't finished the project yet.


It took me all of three minutes, tops, to glue and affix them.


Then I took a damp paper towel, gently dapped a wee bit of black stamp ink and rubbed it over the paper - making sure all my motions were in one direction - and that pretty embossed pattern really popped.


I think they shall be gracing the wall in my bathroom soon.

Project total: around four dollars

(we have to round up a bit since I used the fancy scrapbook paper)

Check out these other transformations: totally hideous vase and the creepy kid watering can.

Saturday, May 30, 2009

Sunday Shout Outs

If SITS can do it, so can I!

The magic of etsy...where else can you find such fabulous stuff being made by crafty folk the globe over?

A couple months ago I hearted a shop called Pretty Perch because I'm having this slight flower obsession lately and she has all kinds of lovely flower items. Last week I finally read her shop announcement and noticed she has a blog! It just so happens I visited during a giveaway and it just so happens I won! My prize was...


Aren't these fabulous?! They are even more pretty in real life. Love them! A perfect summer accessory. So stop by her shop and give things a look, I'm sure you'll find something you like.

My other recent etsy purchase was this lovely handbag from Syl Syl


It's the perfect bag! It holds my wallet, my glasses case, my "just in case" pouch (filled with every goody imaginable) a book and a bottle of water! And it's not like this is a huge purse either. It's a magic Mary Poppins bag that seems to be "practically perfect in every way." (Also, note the floral print continuing my flower obsession)

So not only am I thoroughly please with all my swag but I supported fellow crafters, and I have to say that is a very nice feeling.

Friday, May 29, 2009

A soft, comfy spot for the shinies

Wooden frame from Goodwill painted white (to hide the frighteningly hideous 70's colors that probably were the cause of WHY it was at Goodwill). A scrap piece of cardboard to fit within was given a light amount of batting and then "upholstered" (with glue, don't get complicated on me) with muslin and tacked into the back of the frame. I made sure not to have the batting go out to the very edge of my cardboard so I wouldn't have such a hard time getting it to fit in the frame.

Some sewing pins stuck at an angle and now your shinies can dangle - organized and untangle....d


Oh come on, that was pretty good rhyming.


Total cost was (a guesstimated) paltry three dollars.

Monday, May 25, 2009

Vintage inspired pin-up hair clip

That title was a mouthful wasn't it?

Well it's been fantastic weather lately and you know what that means! Cruise-ins! Blame it on my parents - who grew up in the 50's - but I love classic cars. My friend and I would put on our poodle skirts and pile into the back of our 1951 Chevy Bel-Air and hit all the local car shows. Yeah really, I wore a poodle skirt. I even have vintage cat's eye rhinestone sunglasses I wore to complete my ensemble.


I've tamed my wardrobe a tad since then and stick to sunglasses and this awesome purse I bought at Cherry Redd.


Looooooooooove!


To add, and yet not go overboard, a little flower for my hair seemed like the right idea.


Instructions:

Start by picking a faux flower you can pull off of the stem. The flatter the flower the easier it will be to attach. The first clip I made I used an orchid which was perfectly easy for a first try.


But for my second I wanted to try a rose.


Choose a ribbon color that complements the color of the flower and will blend in. I was having trouble deciding between brown and pink but went with the pink because it was wide enough to cover the whole clip.


Unwind a little ribbon from the spool and dab a bit of tacky glue on the back and front of the clip handle.


Hold the ribbon in place using something like a clothespin or a paperclip until this part dries.


Once that portion is dry, apply the glue along the rest of the top of the clip and smooth on the ribbon. I like to cut my ribbon a little long and tuck the end under the clip's edge. With the clothespin now holding the end in place until dry it also prevents the top and bottom of the clip from being glued together!


Now walk away and keep yourself occupied until it has dried COMPLETELY - I'd say around 45 minutes to an hour.


Your flower should have a little nobby on the back from where you pulled it from the flower sprig - clip that off with scissors.


I like to attach my flowers to the be-ribboned clip with E6000 adhesive because that stuff is amazing and it doesn't take a whole lot to work well.


Line up your flower somewhere near the center of the clip and try to get a leaf or petal to cover the clip's handle so it won't show when you wear it.
Now put this somewhere flat and safe where it can dry for a few hours. If the flower you choose is flat like the orchid, it's easy to leave, but if it has more dimension like my rose, you may have to prop the flower up with something to make sure your end product doesn't come out crooked.


And there you've got your very own vintage inspired pin-up hair clip. Or if you're not into that its still really cute if you just like flowers!


I was listening to music while I worked, heehee!

Need some vintage inspiration?
Try this from my favorite group of all time: The Ventures.


Wednesday, May 20, 2009

Cake plate catch-all

First, let me mention I have a fundraiser going on at my etsy shop to support one of my former students and her work with the school's Relay for Life team. There's a link in my shop announcement that will take you directly to her page if you are interested in just donating directly rather than participating in the fundraiser. I'll be adding new items to that category as soon as I get time for a little creating.


Second, the following project is a birthday gift for my mom so if you know her don't mention it to her!


Last (but certainly not least!), this project is a part of Reinvented's Trash to Treasure Tuesday! So go visiting and see all the other wonderful projects!

Yes I know it is Wednesday. That's just me, always a day late and a dollar short. *sigh*

~~~~~~

At Joann Fabric and Crafts I found an adorably ruffle-edged salad plate they were clearancing and as soon as I saw it I knew it would be the perfect companion to a broken candle holder base I've had banging around my junk piles for years.


I actually liked the original vintage-style turquoise color, but that won't go with my mom's bedroom decor of creamy white and soft peach.


I bought a can of spray paint specifically for plastic items and first cleaned the plate with rubbing alcohol to remove any oil left behind by my hands (my brother's suggestion and since he took a painting class - I mean House of Kolor painting not beret and bagels painting - I thought I'd better listen!).
With two good coats of paint the plate looks like it was always that color!
I did not paint the candleholder base - its current color will work just great!


Once it was dry and cured (I waited a few days) I glued my candle base to the plate bottom using E6000 adhesive.


Now she's got a cake plate-inspired spot to toss her jewelry if she doesn't feel like putting it totally away.

Hurray for organization with a little style, a little creativity and very little money!


Monday, May 18, 2009

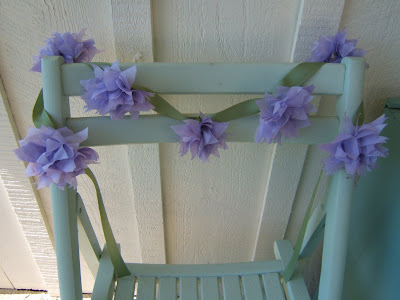
Pom-Pom Garland

(Mostly) easy, incredibly affordable and pretty cute even if I have to say so myself. With all that going for it why wouldn't you want to try this?


I came across the pom-pom instructions over at Martha Stewart and fell in love with their beautiful fluffiness. I've made a few before for package embellishments but I wanted to try the little "napkin ring" size.


After reading the reader comments I decided to forego their suggested size and try a 5x5 inch square of 6 layers of tissue paper. Once I'd cut several I attached my floral wire - do not pinch the paper, wrap the wire flatly - and worked away.

The tissue paper I had was pretty thin even by tissue paper standards and was quite easily ripped and I had to work slowly. I think a slightly higher quality paper would allow you to work more quickly.


Once I had all my pom poms opened I wired them around my length of 7/8 inch grosgrain ribbon. Start dead center of your ribbon length and work outwards to get them evenly spaced.

Use wire cutters to clip off most of the excess wire and then some needlenose pliers will turn the sharp edges under.


Though the tissue paper is light, the wire adds more weight than you might think. I didn't get a chance to try hanging the garland up, but I suspect you may have to have small ribbon loops in between each pom pom to keep them all facing outwards- but that's just a guess. It does, however, drape beautifully!

If you try it out let me know!


Linking to: Spring Categorically Crafting @ Someday Crafts

Thursday, May 14, 2009

Head in the clouds

Have you checked out Missie Zee's etsy shop? She's the Crafting with Cat Hair blogger and you HAVE to go see all her cute stuff!

Her projects have actually inspired me to try a felt project of my own. I have two birthdays rapidly approaching and very close to one another so while it seems a bit quiet here let me assure you that backstage there is a flurry of activity that will be revealed at the appropriate moment. In the stead of a project I thought I'd share something else that has been occupying me this spring:


Usully this time of year we get a sky hidden by a flat sheet of cloud. It's really kinda depressing, but this year we've actually been able to see the sky!

I've had my head pointed up most of the time checking out the cool cloud formations and the evolving sunsets...


You'll see these trees a lot, they are in front

of the sunset every night. :)


Love the layers in this one.


Thursday, May 7, 2009

Frogs, cheese and flowers - oh my!

I was cleaning out a cupboard when I found this little guy


It's a parmesan cheese shaker...or a red pepper flake shaker depending on your tastes. It came from Goodwill or The Dollar Tree and for some reason it got poked wayyyy into the back of the cupboard and is being ignored. Don't really have a need for a parmesan shaker at the moment. Don't like red pepper flakes so that's not an option for me.

Instead when I looked at it I saw something I could use to fill the antique frog vase void I've had for years. What is an antique frog vase?


I love these! But could never justify buying even a replica. Not really sure why they call it a "frog" but they do. If anyone knows feel free to share! Anyway, the wires keep your flowers from flopping all over the place. Great idea, really.


My version isn't as pretty, but it still works pretty well! And it was a whole lot cheaper, which always makes me smile.


I think this would be cute on a breakfast in bed tray.


When you are arranging flowers in a vase be sure to remove all the foliage that will be underwater and remember to cut the flower stems at a 45 degree angle. I like using a small paring knife rather than scissors since scissors will pinch the stem, not allowing maximum water absorption.

And if you use wider flowers you could probably cover the silver metal top altogether. But for now my forget-me-nots and thyme work for me.

Tuesday, May 5, 2009

Starbucks and No Bucks!

This project was featured on One Pretty Thing.


Still looking for a gift for mom? Want one that gives you something yummy and then costs nothing? Want something that upcycles? Want one that's included in this week's trash to treasure over at Reinvented? Can't get much more specific than that. How about:


I am not a huge coffee freak or even a Starbucks advocate but occasionally they just sound soooo good. Especially when you find a four-pack of raspberry dark chocolate at the Grocery Outlet for $1.99. *Squeals in delight*

If you don't have a Grocery Outlet in your area, you have my total sympathy.

Once I was done drinking them I couldn't seem to just toss the glass into the recycling. They have a semi-old-fashioned milk bottlish shape that just screamed "vase" to me. Oh don't worry, it didn't literally scream at me, that was probably just my nerves after all that coffee.


Problem: the label residue. I know I was just complaining about that but seriously! Why does it have to be SO sticky and why can't I find my Goo-Gone?! Rubbing alcohol didn't work either. Neither did a container of bug and tar remover that looked like it was from the '70's. So how did I get it off?


Coca Cola and razor knife.

Yeah!


And I swear this isn't a product placement post. Actually my brother suggested it when I was telling him my sticky residue woes. He's a smarty! I poured a little of the Coke into a bowl, dipped the razor knife into it and scraped the residue right off. And yet this didn't deter me from drinking the rest of the can....


Now to embellish. I had this idea in my head to use a lovely patterned vellum I have as a background and then print a little label - I have printer ink again! Yay!!! - and glue that over the top and add some ribbon. So I went with a black and white theme and did just that. Let me just say that vellum really doesn't want to be glued to a non-flat glass surface. It doesn't want to really stick to glass at all, but somehow I tacked it down enough to stay. To keep it secure I added ribbon around the edges. And then you get:


Simple, yes, but sometimes less is more! And the flowers I was using for props were some that I made in this post.


Since I had so many of these bottles to work with I wanted to try something I saw over at Thrifty Decor Chick - the jute covered bottle. This one is considerably more time consuming but still has a great effect.

First I applied tacky glue directly to the bottle. Then, starting in the back, I wound the jute around and around. When I reach the place I wanted the label I stopped, applied the label and then kept going until it looked right to me.


So easy I made it while I was cooking dinner.


Of course after all that there was dinner clean up and I wasn't up to trying any more styles, but I still have a few bottles left and a couple labels I didn't get to use. We'll see if I can come up with anything else. I think a matching trio would be really nice...


If you'd like to make your own you are welcome to use the labels I created. Just follow the links below, right click and save the photos to your own computer, and then be sure to resize them to fit your needs. Have fun!


Sweet Blossoms

Natural Beauty

Blooming Beauty

Stop and Smell

Saturday, May 2, 2009

Shop Update - time sensitive!

On my last visit to the Post Office I discovered they will be raising the price of postage...again.

As a result I will unfortunately have to raise my etsy shop prices - I may try to balance it out between item price and shipping price but either way prices are going up.


I'm not going to make changes until May 8th so you have until then to shop while things are easier on the pocketbook!


Hope you are all having a wonderful weekend! (not dreary, rainy and windy like mine)