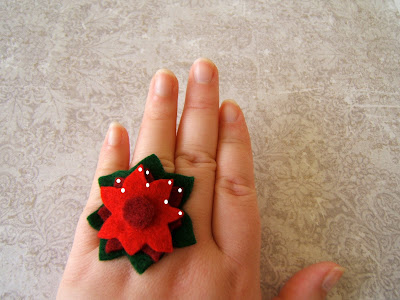
 Poinsettia Day was the 12th but I wasn't able to get my ducks in a row fast enough to get this posted in time - so remember for next year!
I designed this ring with the idea that any budget could try it out, and it's simple enough that older kids could get their craft on as well. It's very similar to my [Valentine's Ring.]
What you'll need:
scissors
pen
templates (see below)
thin elastic hair band
felt glue or anything comparable
1 piece or scrap of green felt or eco-felt
1 piece or scrap of bright red felt or eco-felt
1 piece or scrap dark red felt or eco-felt
My three colors came from my eco-felt stash.

I have enough scraps of eco-felt like this round to fill up a shoe box so I love coming up with projects to use it up. I first drew a basic flower shape on some paper and cut it out to make my template. A regular ball point pen will trace onto the eco-felt.
 I cut one of those out of the dark red and one out of the bright red.
I used a similarly shaped but larger-sized template to cut out my piece from the green eco-felt.

Whenever one of my elastic hair ties gets stretched out in one spot like in the photo below - and thereby making it ineffective at holding my hair back - it goes into my craft stash rather than the garbage.

I simply measured it around my finger and cut it just slightly smaller than that measurement. Using old hair bands makes these rings very comfortable to wear and secure too, since they tend not to slide like traditional rings can if they are too loose.
Using my felt glue I layered my pieces starting with the green. Alternate their positions as much as possible so all the leaves are showing, giving a nice layered look.

And whichever color red you layered on the bottom, cut out a small circle to glue on as the center of the flower.

You'll also want a small green circle to glue onto the bottom of the flower, once you've added the hair band. (I ended up cutting my green circle much smaller after the photo!)
Once the glue for the flower is dry, turn it over and position and glue the elastic hair band piece you cut earlier. Clothespins work great as a second and third pair of hands and will hold the band in place until the glue dries.

Glue the green circle over the ends of the band to finish it off and help keep them in place.

Once everything is dry you are ready to wear your ring!
Linking to:
If you'd like to add extra security and detail to your ring, you can stitch the pieces together (along with the gluing) in stages. My recommendation:
If you'd like to add extra security and detail to your ring, you can stitch the pieces together (along with the gluing) in stages. My recommendation:
Stitch the elastic hair band onto the bottom of your green piece. Stitch the bottom red color to the green. Then the next red over and then the top circle. Now cover the stitches as much as you can with your bottom green circle.
Stitching gives it a bit of a quilted look even if only done in about two spots per leaf side like shown below.
Stitching gives it a bit of a quilted look even if only done in about two spots per leaf side like shown below.


5 comments:
So cute, Molly! I might have to whip up one of these to wear to Christmas dinner. :)
How adorable! Thanks so much for the tutorial! Theresa
Beautiful! Make a Great Pin to!
T =)
Oh, I love this idea! I may try to make these! Hugs! ♥
Adorable! I would totally wear these. Thanks for linking up with us--I hope to see you back for the next blog hop in January. I also wanted to let you know that we featured all of the blog hop projects in a special newsletter mailing that went out to our 850,000 subscribers!
Karisa
Editor, FaveCrafts.com
Post a Comment